31 Mar 2019
Today is the world backup day.
This is a wonderful excuse to talk about how I do backups (again).
And I can happily report that the solution I build and blogged about is working perfectly.
(If you missed that here is the blog post from two years ago ZFS remote backups).
The biggest change since then is the hardware. You might remember
that I own a Dell T20 which
is still very cool hardware but with a Intel(R) Xeon(R) CPU E3-1225 v3 it uses quit a bit of power.
That is why I switched to a self built solution with a Intel(R) Xeon(R) CPU D-1528. This is 35 watt TDP instead of 84 watt TDP. But you can
read all about that in my previous blog post Self built NAS
The big improvement I implements since last year is the monitoring.
I switched from observium to telegraf, grafana and influx for monitoring.
The next logical step was to create a dashboard for my backup status.
This is how it looks (you can find the template in this gist):
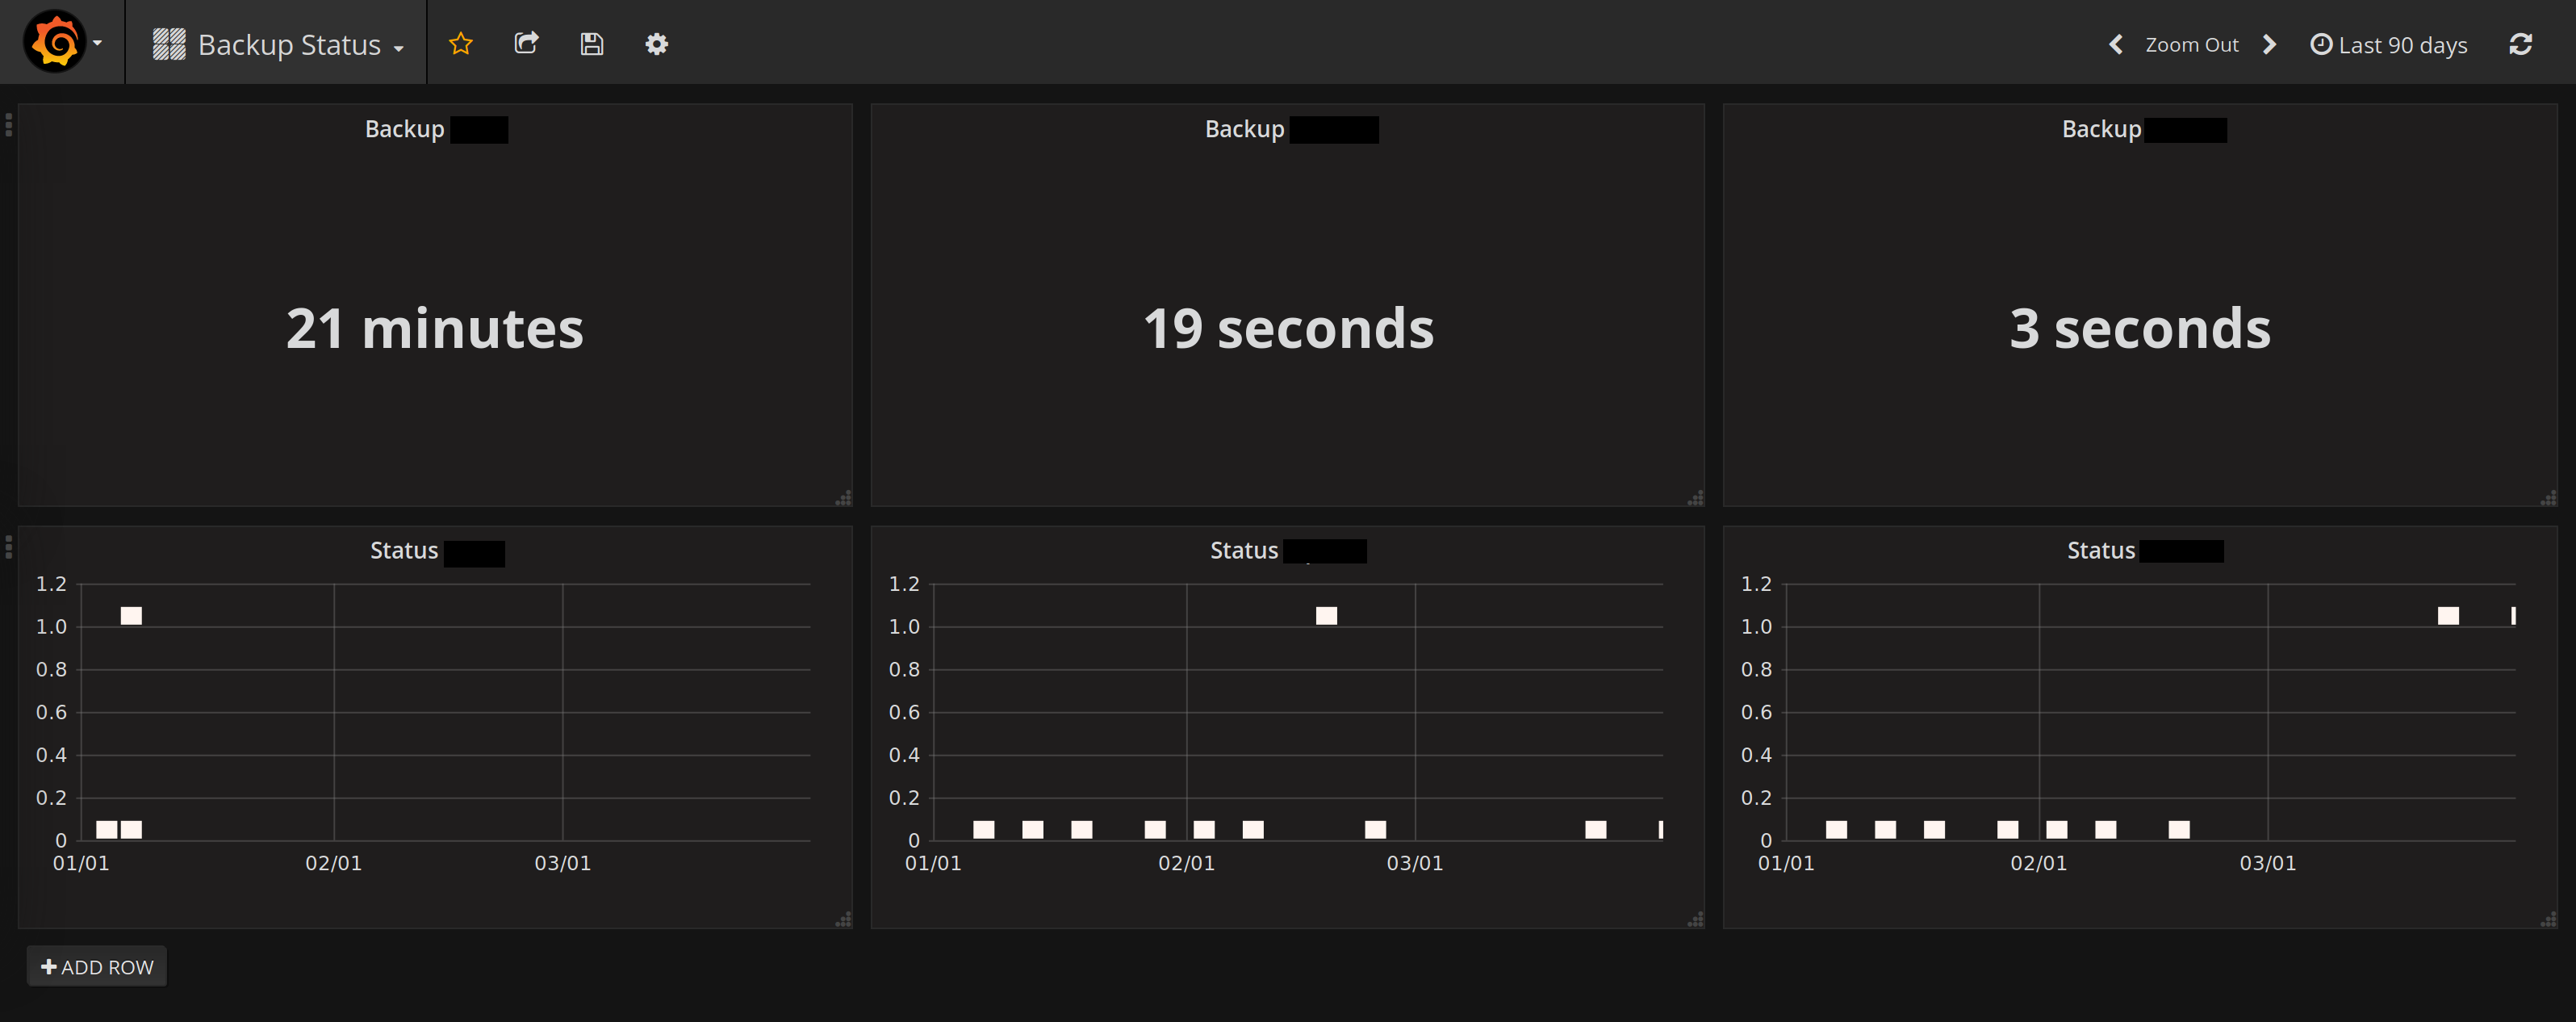
Which is so much better than just write the infos to a log file
in /tmp and check it manually.
It is built with the Line Protocol of influx.
Which allows to post data with curl.
curl -i -XPOST -u username:password 'https://hostname:8086/write?db=databasename' \
        --data-binary "backup,host=backuphost status=${code}i
backuptime,host=backuphost value=${SECONDS}i"
It is not perfect but it is the best solution I ever built.
And here is your reminder: do backups,
check if your backup was executed successful (visibility in a dashboard helps immensely)
and last but not least try to restore it. A backup with out restoring is useless.
23 Mar 2019
Requirements for my new NAS
I thought it's 2019 and time for 10GbE. Also I was bored, so I upgraded my
Dell T20 after 5-ish years.
The main features I was looking for: lower power consumption, 10GbE Network and
M.2 SSD boot support.
M.2 SSD boot support is important to me since I upgraded the Dell T20 with a PCI adapter
to have a M.2 SS as boot device. Which did not work as well as expected and I needed a
USB stick for /boot. This is very annoying.
10GbE Network is self explanatory it is the future and who doesn't want the future now.
Last but not least less power consumption the Dell T20 comes with a Intel(R) Xeon(R) CPU E3-1225 v3
which has a 84 watt TDP which is unfortunate but I needed the power for Plex movie encoding.
But as time has gone on CPUs use less power for the same or more performance.
What I built
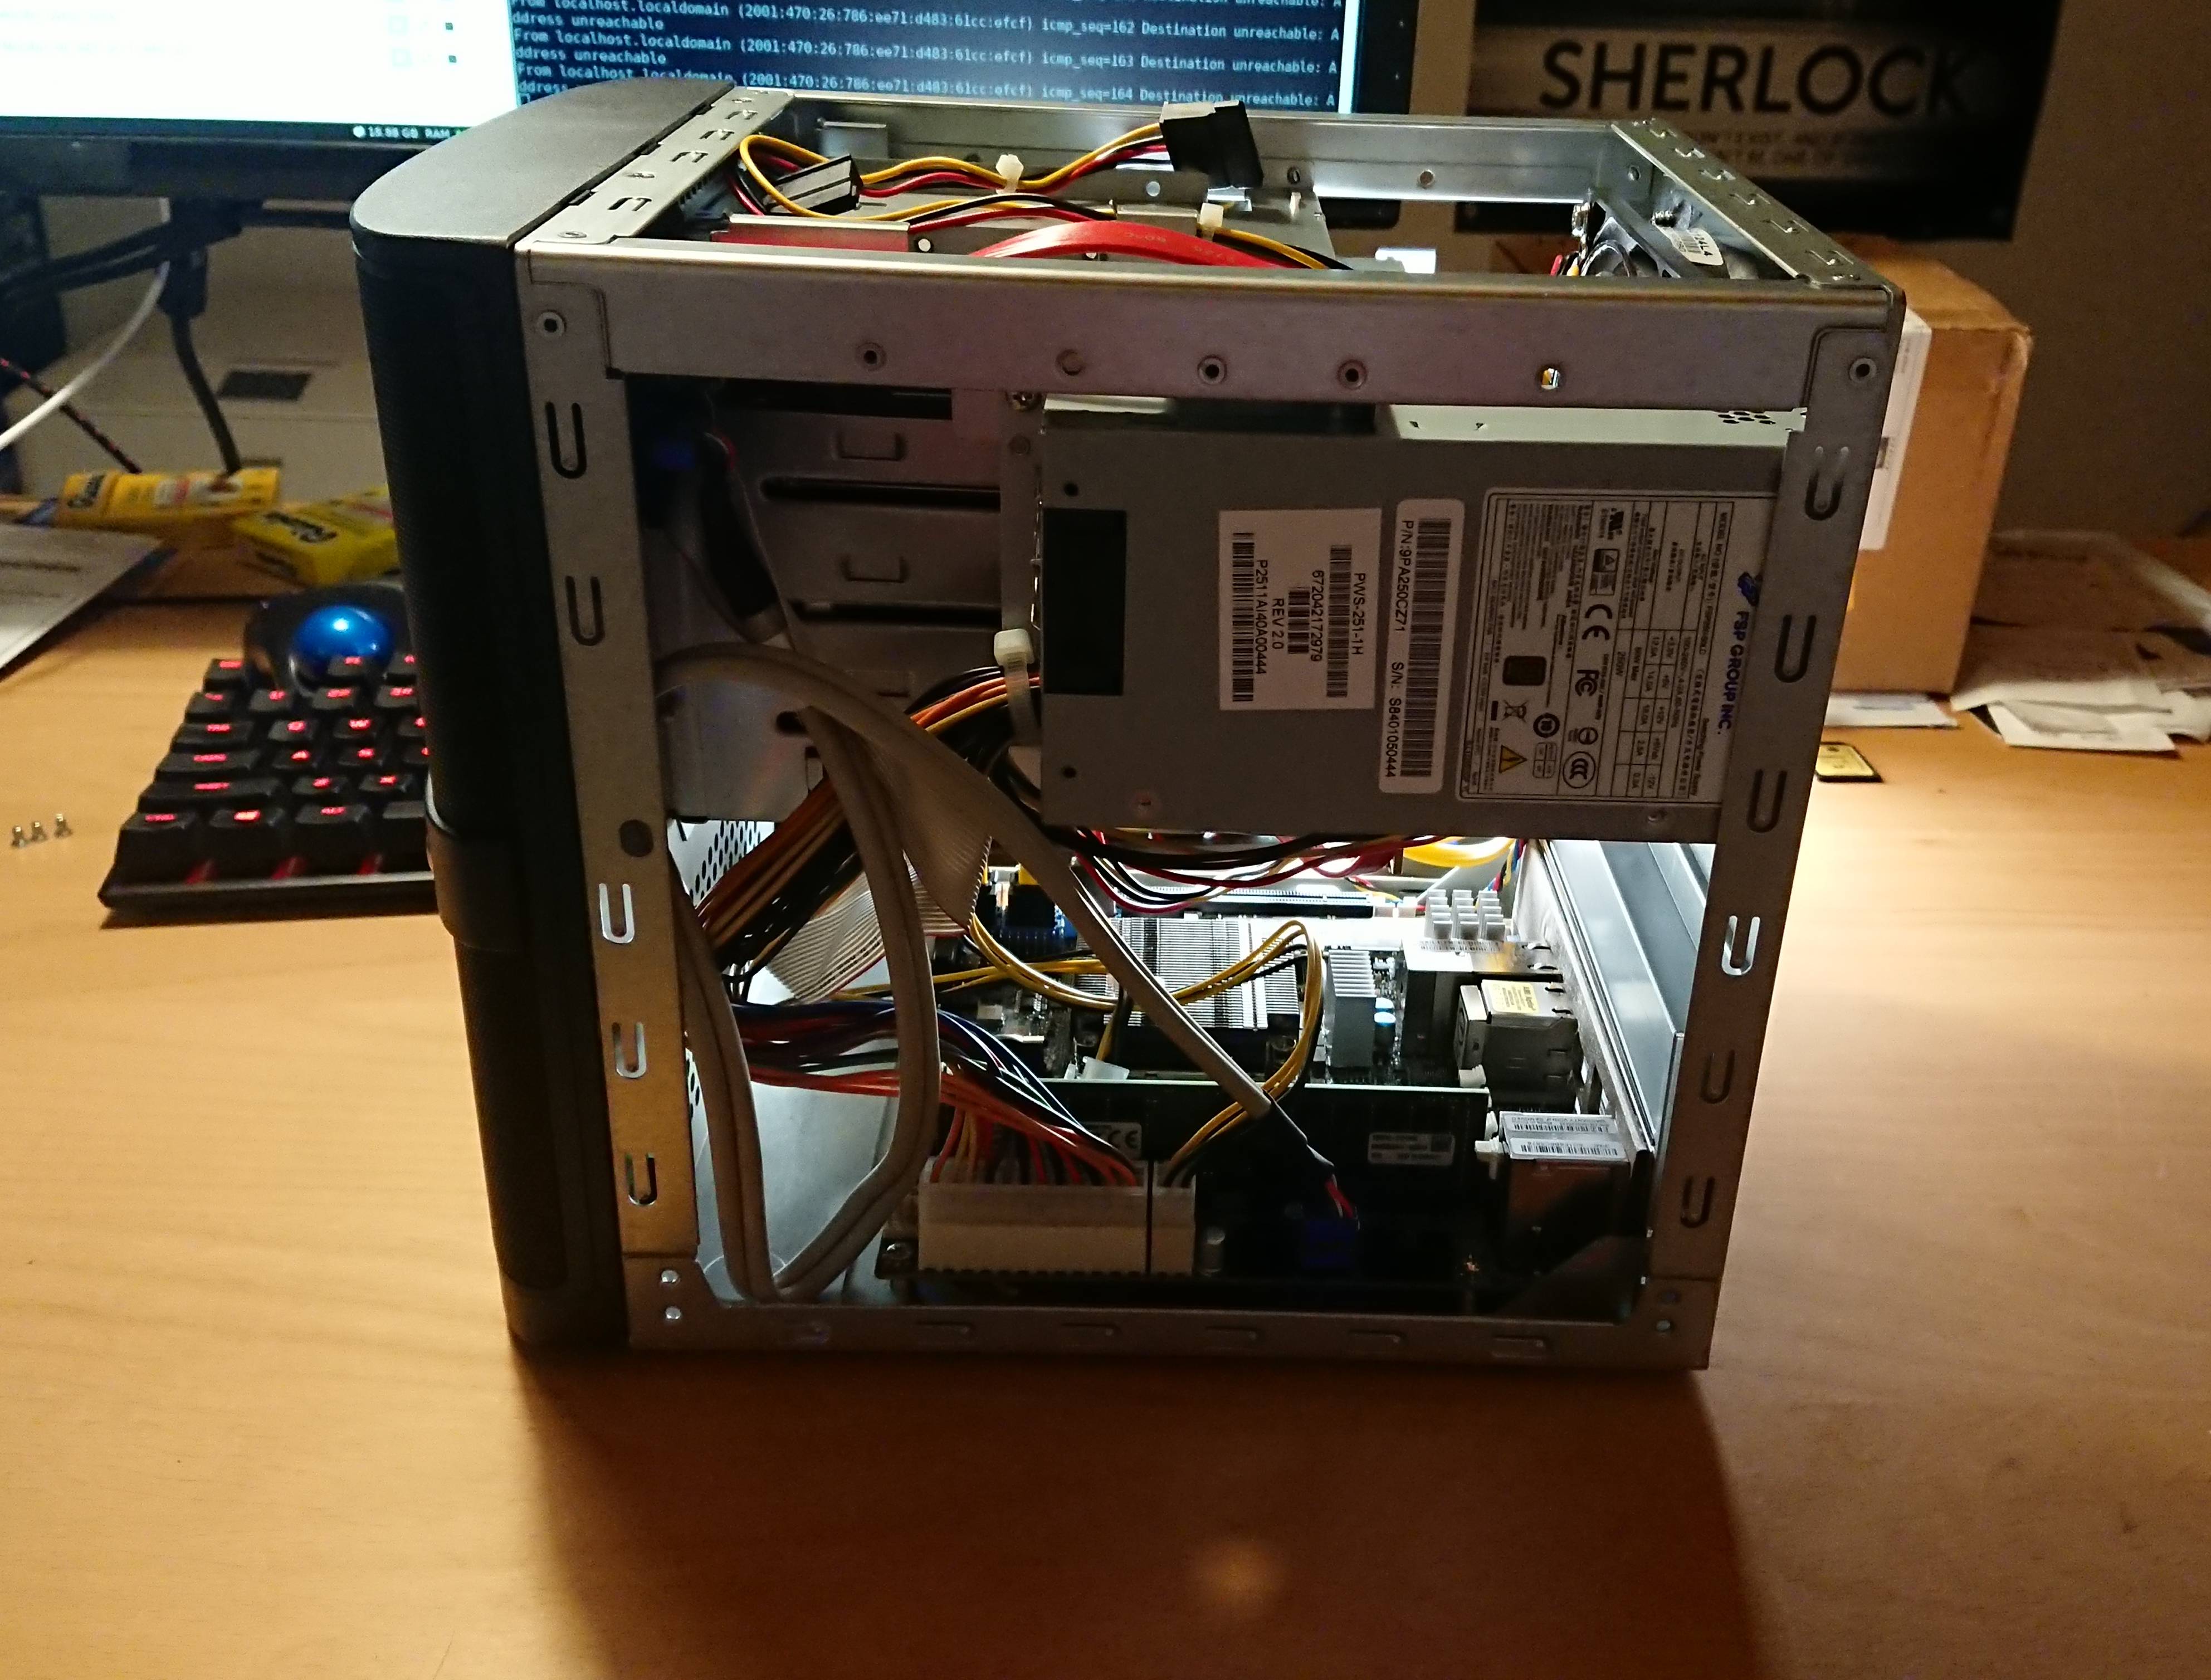
As motherboard I selected the MBD-X10SDV-6C-TLN4F-O.
It ticks all the boxes, I wanted to have from new hardware. Also I think it is one of the
better price/value motherboards you can find. It has 2 10GbE NICs. It has the M.2 SSD slot on
the motherboard and I can boot FreeBSD from it. And it uses a Intel(R) Xeon(R) CPU D-1528
which is 35 watt TDP. That is less than halve of the E3-1225 v3 at the same passmark score.
This means it still is fast enough to live transcode my plex moves for me.
This motherboard is now in a Supermicro mini tower SC721TQ-250B.
In general I like the case but in comparison to the Dell T20 it is not as quite as it use to be. Mostly the fault of
the 30mm fan on the PSU I guess. But on the bright site with this case it is possible to hot-swap disks. And I got an
insanely good deal on it.
To power my ZFS pool which is still on 3x8TB HDDs (never did an update on this as far as I remember)
I added Kingston Server-Branded Memory KSM24RD4/32HAI 32GB ECC, Registered. As boot disk I use a
Samsung SSD 860 EVO M.2 500GB which is more than enough space for the base OS and all my jails.
Migration
Thanks to ZFS and iocage the migration was very smooth. I just
setup FreeBSD 12.0 and copied over a few config files like /etc/rc.conf. Exported the ZFS volume
on the Dell T20, put the disk in the new server and just imported it again. I did the same for
all the jails just iocage export and iocage import on the other side. After some minor
jail config tweaks all my services where up and running again. (I forgot to migrate a jail but that is
a story for an other time) The entire migration took about 45 min from start to finish.
27 Jan 2019
2019 is the year of Linux on the desktop 🎉! Or something.
We all know to be a successful platform you need to have
emojis. And who can hate emojis, they are the best.
So here is how you get a simple way to use emojis and other
special characters on Linux (with i3 and rofi). It was
surprisingly easy (probably because I mostly just stole it from
entiPi).
You need two programs to get started rofi to display the menu and xclip
to put characters in your X selection buffer to paste it. My keyboard shortcut
is Win + u for unicode. And it looks like this in my i3 config:
bindsym $mod+u exec --no-startup-id rofi -lines 10 -dmenu -input ~/.symbols.txt | cut -d' ' -f1 -z | xclip -selection c
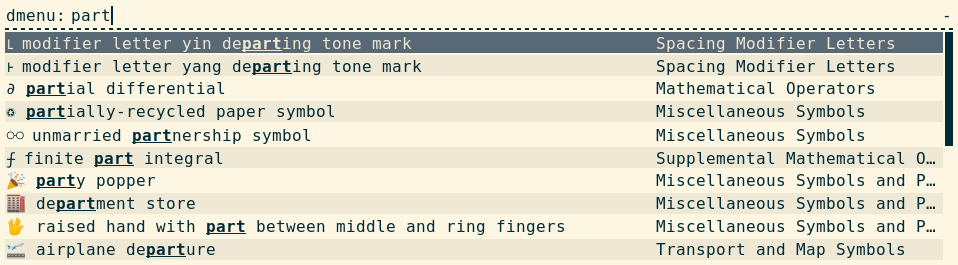
As you can see it takes the character from the .symbols.txt file. The format is simple
it is just 'character' 'name' 'category'. Checkout a example symbols file from
github
☮ peace symbol Miscellaneous Symbols
Now you can search for the character and press enter to add it to the X selection buffer
and paste it where ever you want (Terminal, Pull Request, Email, etc.).
👍 Have fun with unicode 👍
01 Dec 2018
There are this moments in my life where I get really excited about
technology. The latest of these moments was when I found out that
nginx autoindex supports xslt out of the box.
Lets go 2 steps back what does that even mean. Nginx autoindex is the feature
which allows you to list all available files and folders in the web root of you server.
So it's just a very simple web page listing all files as link. The config for that
looks like this:
location /documentation {
	autoindex on;
}
The problem is, this list is really basic. Maybe this list is not good enough, maybe
you want more than files just alphabetically sorted and listed. Maybe you want to sort
them by date, alphabetically descending or something else. Maybe you want to style this list
which some CSS. And that exactly what I want to do. I have folders with different versions
like 2.07.03 and 3.0.0 and I want to sort them in a way that you see the latest version first.
So that you see 3.0.0 > 2.07.03.
And here comes xslt (and my excitement) in to play. Nginx autoindex does also support
three alternative output modes to html. Thats xml, json and jsonp. And when you use
xml you can provide your own xslt file. So that is what we do:
location /documentation {
	autoindex on;
	autoindex_format xml;
	xslt_stylesheet /path/to/your/transform.xslt;
}
You find the full documentation for the xslt module here. And now we can use all the amazingness of xslt.
The plain xml autoindex generates looks like this:
<?xml version="1.0"?>
<list>
  <directory mtime="2018-08-23T09:40:02Z">2.12.01</directory>
  <directory mtime="2018-11-19T15:04:06Z">2.12.02</directory>
  <directory mtime="2018-09-05T14:07:04Z">3.0.0</directory>
  <directory mtime="2018-10-08T07:14:02Z">3.0.1</directory>
  <directory mtime="2018-11-29T17:06:58Z">3.0.12</directory>
  <directory mtime="2018-11-13T11:34:26Z">2.99.99</directory>
  <directory mtime="2018-11-29T17:06:58Z">latest</directory>
</list>
And here is how you sort with xslt by version.
<xsl:stylesheet version="1.0"
xmlns:xsl="http://www.w3.org/1999/XSL/Transform">
<xsl:output method="html" encoding="utf-8" indent="yes"/>

<xsl:template match="/list">
    <html>
        <body>
            <table>
                <tr>
                    <th>name</th>
                    <th>date</th>
                </tr>
                <xsl:for-each select="directory">
                    <xsl:sort select="substring-before(., '.')" data-type="number" order="descending"/>
                    <xsl:sort select="substring-before(substring-after(., '.'), '.')" data-type="number" order="descending"/>
                    <xsl:sort select="substring-after(substring-after(., '.'), '.')" data-type="number" order="descending"/>
                    <tr>
                        <td>
                            <a href=".">
                                <xsl:value-of select="."/>
                            </a>
                        </td>
                        <td>
                            <xsl:value-of select="substring(@mtime, 9, 2)"/>
                            <xsl:text>-</xsl:text>
                            <xsl:value-of select="substring(@mtime, 6, 2)"/>
                            <xsl:text>-</xsl:text>
                            <xsl:value-of select="substring(@mtime, 1, 4)"/>
                            <xsl:text> </xsl:text>
                            <xsl:value-of select="substring(@mtime, 12, 8)"/>
                        </td>
                    </tr>
                </xsl:for-each>
            </table>
        </body>
    </html>
</xsl:template>

</xsl:stylesheet>
As you can see this creates just a basic html table so I leave it up to to
you to Style it in a way you like. And a big thanks to
michael.hor257k on stackoverflow
who created this readable version of the xslt based on my horrible
hacky xslt.
Enjoy your new fancy autoindex pages!
11 Nov 2018
The goal is to create a simple solution to live stream a podcast.
This means I need a audio stream which combines the thing I hear and the
things I say.
To achieve this I mostly copied what makefu
does. The first step is to figure out what the name of your input and output device is.
You can find that with:
pacmd list-sources | grep -e device.string -e 'name:'
pactl list sources | grep -e device.string -e 'Name:' # with pipewire
Which will provide you with output like this:
	name: <alsa_output.pci-0000_00_1b.0.analog-stereo.monitor>
		device.string = "0"
	name: <alsa_input.pci-0000_00_1b.0.analog-stereo>
		device.string = "front:0"
	name: <alsa_output.pci-0000_01_00.1.hdmi-stereo-extra1.monitor>
		device.string = "1"
	name: <alsa_output.usb-Focusrite_Scarlett_Solo_USB-00.analog-stereo.monitor>
		device.string = "2"
	name: <alsa_input.usb-Focusrite_Scarlett_Solo_USB-00.analog-stereo>
		device.string = "front:2"
As we can see here my output device is: alsa_output.usb-Focusrite_Scarlett_Solo_USB-00.analog-stereo.monitor and my input device is alsa_input.usb-Focusrite_Scarlett_Solo_USB-00.analog-stereo.
Now my problem is that my input device is stereo but my microphone only records in mono. But this is
easy to fix, we can just remap our input to mono like this:
pactl load-module module-remap-source master=alsa_input.usb-Focusrite_Scarlett_Solo_USB-00.analog-stereo master_channel_map=front-left,front-right channels=2 channel_map=mono,mono
If we check the list of devices again we have a new input device called alsa_input.usb-Focusrite_Scarlett_Solo_USB-00.analog-stereo.remapped. And this will be the input device we use.
Now we can just create a new stream and map input and output to it:
# create stream
pactl load-module module-null-sink sink_name=stream sink_properties=device.description="Streaming"

# map input and output
pactl load-module  module-loopback source=alsa_output.usb-Focusrite_Scarlett_Solo_USB-00.analog-stereo.monitor sink=stream latency_msec=1
pactl load-module  module-loopback source=alsa_input.usb-Focusrite_Scarlett_Solo_USB-00.analog-stereo.remapped sink=stream latency_msec=1
The only thing left is to have a darkice which is compiled with mp3 support and then you can stream
to any icecast server like this:
My config looks like this:
[general]
duration = 0
bufferSecs = 5
reconnect = yes
realtime = no
rtprio = 2

[input]
sampleRate = 44100
bitsPerSample = 16
channel = 2
device = pulseaudio
paSourceName = stream.monitor

[icecast2-0]
format=mp3
channel=2
bitrate=128
bitrateMode=cbr
quality=0.6
server=dns.name.or.ip.of.your.icecast.server
name=Testi test
description=Test test
public=yes
localDumpFile=dump.mp3
mountPoint=your_mountpoint.mp3
password=XXXXX
port=9000
And thats it, happy streaming!